Get a client authentication certificate
This section describes steps to get a client authentication certificate using the Generic User Certificate template, CSR Enrollment Method, and Enrollment Code as Authentication Method. But you can get a client authentication certificate using any of the combinations below:
Template | Enrollment Method | Authentication Method |
|---|---|---|
Generic User Certificate | CSR | Manual Approval |
Generic User Certificate | REST API | Enrollment Code or 3rd Party app |
Generic Device Certificate | CSR | Manual Approval or Enrollment Code |
Generic Device Certificate | REST API | Enrollment Code or 3rd Party app |
Create profile
Sign into DigiCert ONE and navigate to Trust Lifecycle Manager.
Select Manage Profiles from the left navigation menu, then Profiles.
Select Add profile.
Select the Generic User Certificate template.
Note: The appropriate license for the seat type of the template selected must be purchased and available in your account, otherwise that template’s link will be disabled.
Under the General information section, enter the profile Nickname and choose the Business Unit and Issuing CA.
From the Enrollment method dropdown, select CSR.
From the Authentication method dropdown, select Enrollment Code.
Select Next.
Under Certificate fields, select the validity period unit (Years, Months, or Days) and enter the value in the textbox.
Note: You cannot issue an end entity certificate with a validity period longer than the remaining validity of the issuing CA. The issuing CA expiration date is shown as a reference in this section.
Select the Algorithm from the available algorithms in the dropdown list. Available algorithms are based on the issuing CA selected for the profile.
Select the Key type and attribute from the dropdown lists.

Select the checkbox to Allow duplicate certificates if multiple certificates are to be issued for the same seat ID.
Under Renewal options, select the Renewal window from the dropdown list. The default (recommended) value is 30 days.
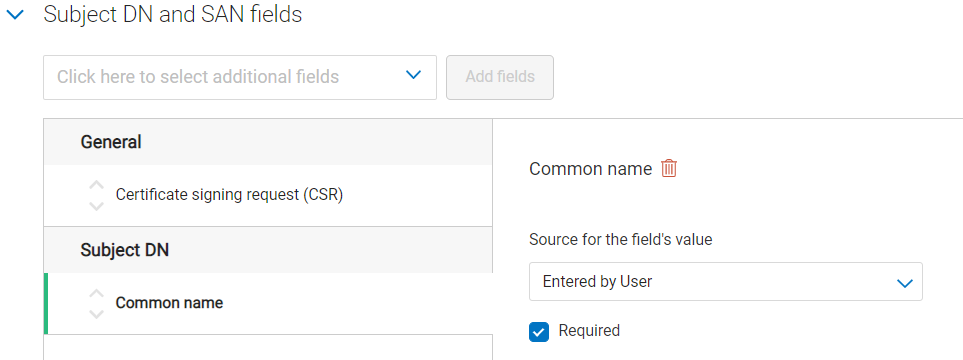
Select Subject DN and SAN fields from the dropdown list. Select the Common name field, then select Add fields.

For each selected field, from the Source for the field’s value dropdown, select Entered by user.
Select Next.
Specify the Key usage (KU) extension criticality and values. Note: the KU options shown differ depending on the certificate template being used.
Specify the Extended key usage (EKU) extension criticality and values. Note: Client Authentication is the minimum required EKU value.
Select Next.
Under Certificate delivery format, select PKCS#7 PEM and Include CA chain with Root CA as the certificate delivery format to use and chain certificates to include when certificates are issued.
Under Email configuration & notifications, specify the template to be used for certificate revocation notification emails.
Under Administrative contact, specify whether to include default or custom administrative contact details in certificate notification emails. Note: including internal support contact details for end users is optional, but recommended.
Under Seat ID Mapping, select the certificate field to be used as the seat ID. This uniquely identifies each enrollment entity, for licensing purposes.
Under Service User binding, select the Service user API token to be bound to the certificate profile. If no Service user is selected from the dropdown, then all API tokens in the account will be able to manage this profile.
Select Create. Your newly created certificate profile is now displayed in the certificate profiles list.
Add User/Device Seat
Select Manage Seats from the left navigation menu, then Add user seat.
Enter a Seat name.
Enter a Seat ID.
Enter an Email (optional).
Enter Phone details (optional).
Select a Business Unit.
Select Create user seat.
Select Enroll Now.
Select the profile created in the Create Profile section from the Choose A Profile dropdown.
Select Enroll.
Copy the Enrollment Code that is required to get the certificate.
Access the link provided in the email.
Enter the Enrollment Code copied in step 11.
Enter the Certificate signing request (CSR) that was generated in the Generate CSR section.
Enter the Common name.
Select Update.
Download the certificate.
Upload client authentication certificate
Navigate to Account Manager.
Select Access from the left navigation menu, then Service User.
Select the Service user for which you are uploading the client authentication certificate.
Select Upload Client authentication certificate under the Authentication certificates section.
Enter a Nickname.
Export the client authentication certificate downloaded under the Add User/Device Seat Section (step 17) in DER or PEM format. Select Click or drag file to upload and choose the certificate.
Select Upload client authentication certificate.
Install RA certificate
Open the command prompt (on the folder where the PKCS#7 file is stored) and run the following command:
> certreq -accept <issued-cert>
Before running the command above, the trusted root certificate must first be installed. If not, the following error will be displayed:
Certificate Request Processor: A certificate chain could not be built to a trusted root authority. 0x800b010a (-2146762486 CERT_E_CHAINING)
Refer to the Configure the Autoenrollment Server section of the DigiCert® Autoenrollment Server Deployment Guide for more information.