Set up the Citrix registration authority
To complete the Citrix FAS integration, you need to get and install the certificate for the Citrix registration authority (RA) and configure the rules for issuing user certificates.
Notice
DigiCert uses the "offline" method to get the long-lived RA certificate. You will request the certificate out-of-band through the Trust Lifecycle Manager REST API and then use a Citrix cmdlet to import the certificate into Citrix FAS. For additional details from Citrix, see https://docs.citrix.com/en-us/federated-authentication-service/current-release/config-manage/private-key-protection.
a. Generate the CSR in PowerShell
Enter the following two Citrix cmdlets in Windows PowerShell to generate the CSR for the RA certificate:
> Add-PSSnapin Citrix.Authentication.FederatedAuthenticationService.V1
> New-FasAuthorizationCertificateRequest -address <FAS server host>
For example:
PS C:\Users\Administrator> Add-PSSnapin Citrix.Authentication.FederatedAuthenticationService.V1
PS C:\Users\Administrator> New-FasAuthorizationCertificateRequest -address localhost


Id                 : 497cd087-0970-4dbd-81f7-bbdc6b96961a
Address            : [Offline CSR]
TrustArea          :
CertificateRequest : -----BEGIN CERTIFICATE-----
                     MIICaDCCAVACAQIwIzEhMB8GCgmSJomT8ixkARkWEUNpdHJpeFRydXN0RmFicmljMIIBIjANBgkq
                     hkiG9w0BAQEFAAOCAQ8AMIIBCgKCAQEAwmkT9l4IKI9icLgmrSKiwMCRkN5CnIj57zZI6v4IC7qC
                     1hyItEbcFdfKn9oQ9v2ykb33oooD288onx61ujNadeIGb7YCq5lz+ZfROVXrzuPzC6dtQOlF4YwX
                     mqkujv16aVl0w8mTZtV78YfykaHT4xmilyAT5GnDwcteOXGcduEzPhtnyOgdRlFbf5LudF35e+it
                     ixHz3ZD3p5n9HXsgF65zs/GXiVkU7Pggt8Nw+6IZYPqs8ZnWtI28F48v3uY3zZ4TnZtx28XYgoLa
                     ZTdJQbSirJsKI2B0lQHK7sZv+XnFHZtgXx3qCO64Wxz0vJgU4z0teATRShQ09CJEWKka3QIDAQAB
                     oAAwDQYJKoZIhvcNAQENBQADggEBAHsJjJyZqKVx12uGnjuMSgbqXSaMUFqPc5Mse+NgdPcKa4EJ
                     F17iYuEQpUTbtQDCGe7C8ndIfTitXIplGrDmrJZS5+oUTNGPwC15/J2aV1iBBN2AJeHm4VjtS8GH
                     hErUW+RZRnZmVLNjEnH0cQqFDwgTvTR0fqc7hmwwhu1RRUJWYKCYR6ycjjNDFh6YHYAIhFvm7ogN
                     aMpUzx2a1SbbcQq/cA6noUj9r54bf+FxZpbsY1/yj/Q8P8QAY0+/IPsq8SI1Ks4e2Hcp2c47FbVO
                     E/nzNgob5vdPU4fT9DKDSv1F4hk47KK+uYh73NxZ1UaYioZH3Jf4gden+rFeORTIqg0=
                     -----END CERTIFICATE-----
Status             : WaitingForApproval
Copy the contents of the Id and CertificateRequest fields from the response and store them somewhere safe. You will need them to request the RA certificate and import it into Citrix FAS.
b. Create the RA requester entity in Microsoft AD
You can use any type of Microsoft Active Directory (AD) entity to request the RA certificate, such as a User, Computer, or Service Account. For security reasons, DigiCert recommends using an entity that is only scoped to manage the Citrix RA certificate.
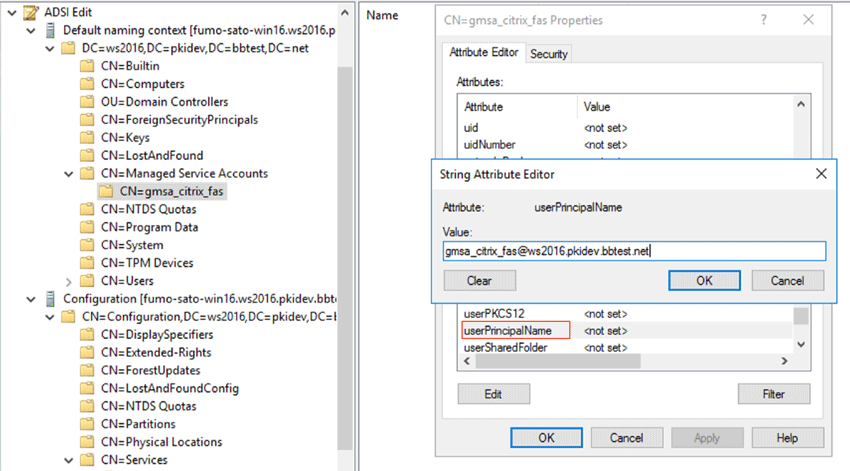
Make sure the userPrincipalName (UPN) of the entity is filled out. For Computer or Service Accounts, use ADSI Edit to add the UPN value.
The following example shows the use of ADSI Edit to add a UPN to a Microsoft gMSA service account:
 |
c. Request the RA certificate via the Trust Lifecycle Manager REST API
To get the RA certificate, use the certificate endpoint from the Trust Lifecycle Manager REST API's Inventory controller. You can read the API documentation by selecting Resources > API reference from the Trust Lifecycle Manager main menu.
Send the following values in the JSON request body:
profile: The ID of the Citrix_RegistrationAuthority profile. You can get this from the profile details screen in Trust Lifecycle Manager.seat.seat_id: Supply any type of identification string, such as an email address.csr: Send the value of theCertificateRequestfield returned by the CitrixNew-FasAuthorizationCertificateRequestcmdlet when generating the CSR. Remove the header, footer, and line feeds. Send only the raw Base64-encoded data.delivery_format: Specify asPKCS7.attributes.extensions.san.user_principal_names: Supply the userPrincipalName (UPN) of the RA requester you created in Microsoft Active Directory.attributes.subject.common_name: Same as above. Supply the userPrincipalName (UPN) of the RA requester you created in Microsoft Active Directory.
Below is an example Trust Lifecycle Manager REST API request and response for issuing the Citrix RA certificate:
To use the returned Citrix RA certificate, copy the value of the certificate field in the response into a file. Remove the quotes and replace the line feed characters ("\n") with actual line feeds in the file, so it looks like this:
-----BEGIN PKCS7-----
MIAGCSqGSIb3DQEHAqCAMIACAQExADCABgkqhkiG9w0BBwEAAKCAMIIFKDCCBBCg
AwIBAgIUU7XSbNx/Ttvz9WaQtnRNSbcv82AwDQYJKoZIhvcNAQELBQAwgaIxCzAJ
BgNVBAYTAkpQMRMwEQYDVQQIEwpLYWdhd2Eta2VuMRUwEwYDVQQHEwxLYXdhc2Fr
aS1zaGkxETAPBgNVBBETCDIxMi0wMDEzMSYwJAYDVQQJEx1TYWl3YWlrdSwgSG9y
aWthd2EtY2hvIDU4MC0xNjEVMBMGA1UEChMMVGVzdCBBY2NvdW50MRUwEwYDVQQD
EwxJQ0EgUlNBIDIwNDgwHhcNMjMxMDI2MTYzMTI1WhcNMjQxMDI1MTYzMTI1WjAz
MTEwLwYDVQQDDChnbXNhX2NpdHJpeF9mYXNAd3MyMDE2LnBraWRldi5iYnRlc3Qu
bmV0MIIBIjANBgkqhkiG9w0BAQEFAAOCAQ8AMIIBCgKCAQEAj1n8IksaaJlh2/TH
mNuVi92Dgvs0xfohkVo5i8Tm4i01CBMtb669y4SKLQyOfgMElH6Cb9eNnVhs1k0i
wWV6x6ZmbcZfLyx45Ci3QM5F/tj2NfffuxFNzFJGDvirEl2eGQ9rt6hf7iw8Iliv
LNzp7G3boqyg0fa5Zix4zKeizRF4sA1dfKwT7qmNYonk5wub/j2Jf3tnWeFrCE+G
m0qzGfT2uGrjp93KoewH3XwB1oGyj/1j5h+uNc36JXmI5XQIAQul+aazF5zfhK51
v0QhuAhNSGMFhkKR+abN+5abdeYzppkxkBs9AHfHgoILhujS9KDNZg8yz46ESEiY
5aOkjQIDAQABo4IBwjCCAb4wDAYDVR0TAQH/BAIwADAdBgNVHQ4EFgQU2L0aTBjc
Ue9sG0Fk5aQfw2Vet/4wHwYDVR0jBBgwFoAUFpxgRdZt1O9O80AemkidHUjAnNcw
DgYDVR0PAQH/BAQDAgeAMBUGA1UdJQQOMAwGCisGAQQBgjcUAgEwHQYJKwYBBAGC
NxUKBBAwDjAMBgorBgEEAYI3FAIBMEMGA1UdEQQ8MDqgOAYKKwYBBAGCNxQCA6Aq
DChnbXNhX2NpdHJpeF9mYXNAd3MyMDE2LnBraWRldi5iYnRlc3QubmV0MHYGCCsG
AQUFBwEBBGowaDArBggrBgEFBQcwAYYfaHR0cDovL29jc3AuZGNvbmUuY2x1c3Rl
ci5sb2NhbDA5BggrBgEFBQcwAoYtaHR0cDovL2FpYS5kY29uZS5jbHVzdGVyLmxv
Y2FsL0lDQVJTQTIwNDguY3J0MD4GA1UdHwQ3MDUwM6AxoC+GLWh0dHA6Ly9jcmwu
ZGNvbmUuY2x1c3Rlci5sb2NhbC9JQ0FSU0EyMDQ4LmNybDArBgkrBgEEAYI3FQcE
HjAcBhRghkgBhv1sJwEBAZWi2MuI/o3AfwIBZAIBATANBgkqhkiG9w0BAQsFAAOC
AQEAfd3/o03CZ8j9coDG39ozvsRr6MxY9z+IlSaJSnQLX3+W9V09uzMM8fPNvObj
7YM8XIS1GK3YvoTE3LnPrFyroPQF1/xxudJM52DnuLN1GLplJ1oJmj/c6WopmE7I
gDMfJxt025DLq7iJazJNcs/ggkfFBednNZinVNO3Pm9DfbkRu1tr/ibLeBGAZANc
YGYllGydOkBCH63bA765T4aLc24DLHjmZnPRt87QRLpP9ZK0L+Ej7D35uSCsZoFi
ntIYYn5tnKNTyKyjljLyKZp3exY7UaHqumrfgNetyJmm475TFW33Cdt7wODiaPVi
GQpulB5nF5XQVC6XOHrque+/vDCCBPgwggPgoAMCAQICFFI360xDXyMouW9eczgT
jfngPVv8MA0GCSqGSIb3DQEBCwUAMIGjMQswCQYDVQQGEwJKUDETMBEGA1UECBMK
S2FnYXdhLWtlbjEVMBMGA1UEBxMMS2F3YXNha2ktc2hpMREwDwYDVQQREwgyMTIt
MDAxMzEmMCQGA1UECRMdU2Fpd2Fpa3UsIEhvcmlrYXdhLWNobyA1ODAtMTYxFTAT
BgNVBAoTDFRlc3QgQWNjb3VudDEWMBQGA1UEAxMNUm9vdCBSU0EgMjA0ODAgFw0y
MzEwMDQwMjU2NDJaGA8yMDUzMDcxMjA5MzAyN1owgaIxCzAJBgNVBAYTAkpQMRMw
EQYDVQQIEwpLYWdhd2Eta2VuMRUwEwYDVQQHEwxLYXdhc2FraS1zaGkxETAPBgNV
BBETCDIxMi0wMDEzMSYwJAYDVQQJEx1TYWl3YWlrdSwgSG9yaWthd2EtY2hvIDU4
MC0xNjEVMBMGA1UEChMMVGVzdCBBY2NvdW50MRUwEwYDVQQDEwxJQ0EgUlNBIDIw
NDgwggEiMA0GCSqGSIb3DQEBAQUAA4IBDwAwggEKAoIBAQDw/WJ0EkQ0i/QcXyaC
F1xDPYXkg+0pw0mKoAeXQIlyVYPBILnYiNkzqa5fFDvdKvaxnXGSO41rZBpCdQI5
BD7qdo3NNdFawnOeza1Qbt3zCNuAl66AlZ/WLGFH2m0wxb/4A/vkW8vS3ACk5TBl
uwevHg3JPbSOlSyTFW6dLjVQNvsilQj35RE7ufQu74VDiop29jKVTv0mskHvGDxv
oVAt601RMlFRRF+mnTM8VzXkEUG7KOQ2SSKQFnMPJHumFwTaYDE9Z2PaqUgtGUWf
o8CGjOOw99Fq2p0nLPyBGRv9V23gtp92Gqp0DxWF1ai23cCbep8+9hgW6QebGIh8
yjIZAgMBAAGjggEfMIIBGzAPBgNVHRMBAf8EBTADAQH/MB0GA1UdDgQWBBQWnGBF
1m3U707zQB6aSJ0dSMCc1zAfBgNVHSMEGDAWgBReHE6nSXBUu56moiD/SEGl+hcL
+zAOBgNVHQ8BAf8EBAMCAYYwdwYIKwYBBQUHAQEEazBpMCsGCCsGAQUFBzABhh9o
dHRwOi8vb2NzcC5kY29uZS5jbHVzdGVyLmxvY2FsMDoGCCsGAQUFBzAChi5odHRw
Oi8vYWlhLmRjb25lLmNsdXN0ZXIubG9jYWwvUm9vdFJTQTIwNDguY3J0MD8GA1Ud
HwQ4MDYwNKAyoDCGLmh0dHA6Ly9jcmwuZGNvbmUuY2x1c3Rlci5sb2NhbC9Sb290
UlNBMjA0OC5jcmwwDQYJKoZIhvcNAQELBQADggEBAIYXtrAIHjmRhVv0+ONAfaUf
Km06wxRFPBIbqUfRTid8rVOmt1KG5oj2w4J9yzmsT0y2gNtXiEjl6NQpmcHTLEbL
ZPoM3BE50PErXSaWuITf0yVWJXW4MahCT24Nzk7vSDptSzsHriErVp/x+vKqdcop
krUhB2ApoCs8XJxu0SHCmP3Wd9GLg0Rh25U0oZD6dKVCzWEawj55fUZQImsHti8V
DplbHYQQGMBrf928gqvyGpDvVg1jnjyn1K/drfTdGkLPqTmXlls/HoWZnXi52y8v
8wmiBOWsBUVK48kl/miGLkYfuvWaFsJiv/Qqt+akbfIiZ+4YaOpkv9oTDvcvGPIA
ADEAAAAAAAAA
-----END PKCS7-----
At this point, the RA certificate is stored in PEM format. You need to convert it to DER format before importing into Citrix FAS.
The following example shows how to use the openssl command-line tool to convert a PEM certificate file called ra_cert.p7 into DER format and output to a new file called ra_cert_final.p7b:
openssl pkcs7 -in ra_cert.p7 -out ra_cert_final.p7b -outform der
Store the RA certificate file in DER format on the Citrix FAS system. You will import it into Citrix FAS in the next step.
Enter the following Citrix cmdlet in Windows PowerShell to import the RA certificate file in DER (p7b) format into Citrix FAS:
Import-FasAuthorizationCertificateResponse -address <FAS server host> -Id <Id from CSR generate> -Pkcs7CertificateFile <path to p7b file>
Make sure the Id value you enter matches the one from the initial CSR generation. For example:
PS C:\Users\Administrator\Desktop> Import-FasAuthorizationCertificateResponse -address localhost -Id 497cd087-0970-4dbd-81f7-bbdc6b96961a -Pkcs7CertificateFile .\ra_cert_final.p7b


Id                 : 497cd087-0970-4dbd-81f7-bbdc6b96961a
Address            : [Offline CSR]
TrustArea          : e28442fe-0bb8-435a-8ae5-ba96e5565bf5
CertificateRequest :
Status             : Ok
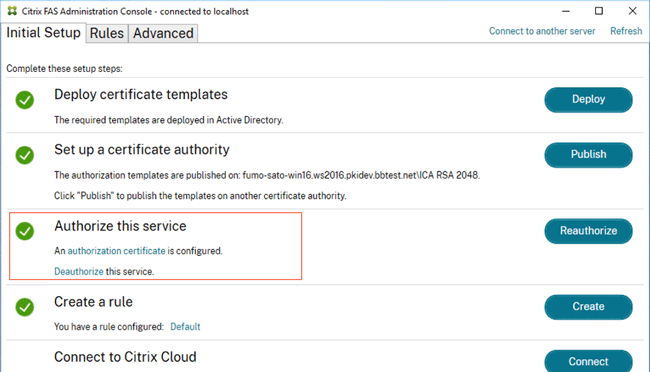
After importing the RA certificate, select Refresh on the top-right of the Citrix FAS console. It should now show a green checkmark for Authorize this service.
 |
Example: Citrix FAS console after importing the RA certificate and refreshing
Configure the rules for how Citrix FAS authenticates users, as described in the Citrix documentation.
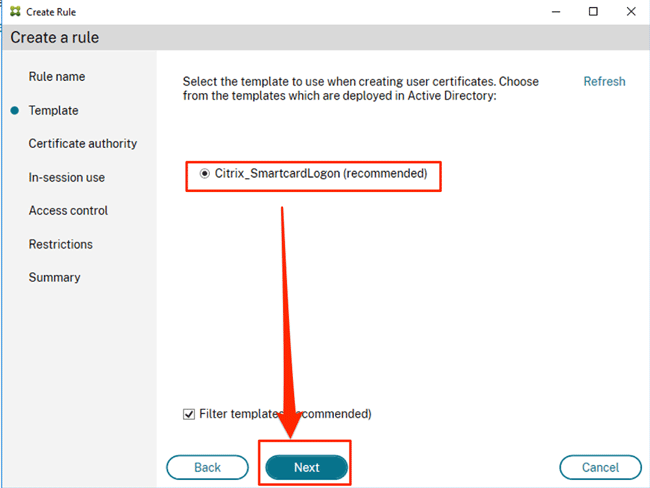
Under Template, make sure to select the Citrix_SmartcardLogon certificate template:
 |
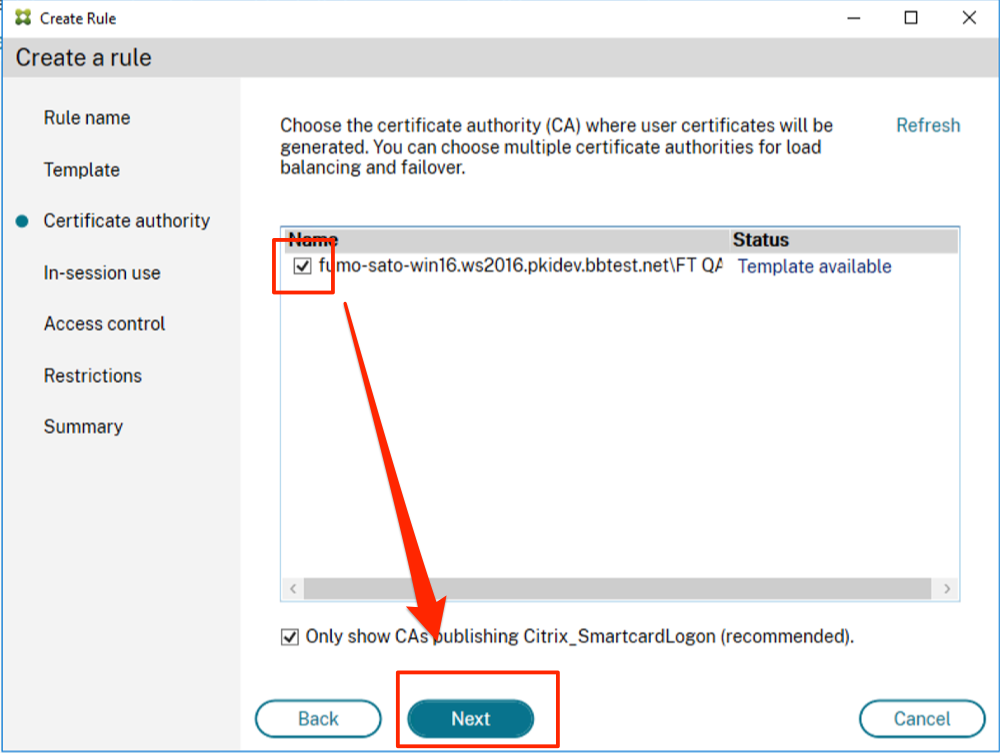
Under Certificate authority, make sure to select your DigiCert Autoenrollment Server (AES) CA:
 |
What's next
You have now finished setting up the Citrix FAS integration for use with DigiCert® Trust Lifecycle Manager. Test the Citrix FAS integration before releasing it into production.