Configure single sign-on with SAML
Configure your DigiCert ONE account, so users sign in with their existing company credentials.
Nota
Two-factor Authentication and SSO
When Two-factor authentication is enabled in Account Manager:
SSO using SAML
You will be prompted to enter an OTP when signing in even if you have already provided an OTP to your IDP.
SSO using OIDC
DigiCert will skip the OTP prompt if you have already provided an OTP to your Identity Provider (IDP).
Sign in to DigiCert ONE.
Navigate to the Manager menu icon (top-right), select Account.
In the left navigation menu, select Accounts.
On the Accounts page, select the Name of the account.
On the Account details page, in the Sign-in settings for all-account-access users section, select the Single sign-on (SSO) pencil (edit icon).
Some identity providers require you to add the DigiCert metadata before they will provide their metadata.
In this situation, you will need to add the DigiCert metadata to your IDP first (step 6) and then add your IDP metadata to DigiCert ONE (step 5).
Add your IDP metadata to DigiCert ONE
On the Add single sign-on access page, in the Upload your identity provider (IDP) metadata section, select Upload IDP metadata, locate your metadata XML file, and select Upload.
Under IDP metadata details, you will see your IDP URL.
Under SAML Certificate details, you will see the certificates Common Name, Expiry Date, and Thumbprint (SHA256).
If your IDP metadata ever changes, you'll need to upload the new version to your DigiCert ONE account.
Before your SAML certificate expires, you must upload a new SAML certificate to your DigiCert ONE account.
Collect DigiCert metadata for your IDP
In the Download DigiCert metadata section, copy the DigiCert metadata to configure in your IDP service (step 9).
SSO URL
Copy the SSO URL and add it to your IdP to help make the SSO connection.
XML file
Select Download DigiCert metadata, download the DigiCert XML formatted metadata file, and add it to your IdP.
Disable standard sign-in method
Disabling the standard sign-in method (username and password) for your account is not required for your SSO integration.
Checking Disable standard sign-in method forces DigiCert ONE users to sign in with the SSO credential. They can only sign in using the single sign-on URL and their SSO credentials.
Leaving Disable standard sign-in method unchecked allows existing account users with DigiCert ONE credentials to sign in via the SSO URL with their SSO credentials or from the DigiCert ONE Sign in to your account page with their DigiCert ONE credentials.
DigiCert recommends leaving this option unchecked until your IDP-to-DigiCert ONE integration is tested and working as expected.
You can disable or enable the standard sign-in method after you've successfully implemented SSO for your account. See Disable and enable password only.
Select Save.
Configure your IDP service
Importante
Your SSO integration will not work until you add the DigiCert metadata to your IDP.
Configure your IDP service with the metadata collected in step 6.
Make sure authentication from your IDP signs the assertion.
Nota
Signing SAML response is optional.
Add single sign-on user accounts
New users
To add new users to DigiCert ONE accounts with SSO, the assigned username in DigiCert ONE must match that of the IDP username.
Nota
When Standard Sign-on is disabled, only the SAML 2.0 username is active.
When Standard sign-on is enabled, the DigiCert ONE and IDP usernames must be kept identical.
DigiCert ONE currently does not support auto-creation/registration of users via the IDP.
Existing users
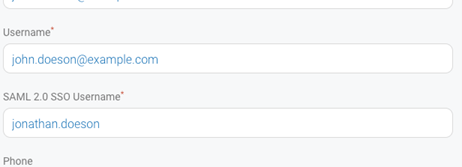
Usernames: For existing DigiCert ONE users, the username is tied to the Standard Sign-on (even if standard sign-on is disabled), prior to enabling SSO. In the Edit user details, a new field SAML 2.0 SS0 Username appears. By default, it takes the DigiCert ONE username. Modify the username here to match with the IDP, if required.

Notification: Existing user receives an email on SSO activation notifying them how to log in.
For Azure AD from another source
Users need to modify their SAML configuration in Azure to ensure the assertion signed. To do this:
Open the SAML configuration.
Click Edit beside SAML Signing Certificate.
Select Sign SAML assertion beside Signing Option, and click Save.
Nota
Signing SAML response is optional.

What's next
After adding the DigiCert metadata to your IDP, sign in and finalize the single sign-on to DigiCert ONE connection.
DigiCert ONE sends existing users in your account the Single sign-on access to DigiCert ONE email. The email lets them know you enabled SSO for their account. To access the SSO sign-in page, they need to select Sign in to DigiCert ONE. They will use the SSO URL to sign in to their account.