Deliver DigiCert ONE login URL to the users

After creating the profile with DigiCert ONE Login, you will need to deliver the URL to the users for login. This section explains how to obtain and deliver this initiation URL through several methods.

Obtaining the URL

Once the certificate profile is created with DigiCert ONE Login, the DigiCert ONE login URL will be shown on the Profile details page. You can access this page by accessing Policies > Certificate profiles > Profile details. Select the created profile.

This URL has the following attributes:

  • Is in format https://<DigiCert ONE host>/mpki/dta-signin/<account-uuid>

  • All profiles under the same account will have the same URL.

  • Is static, always having the same URL per account.

Delivery options

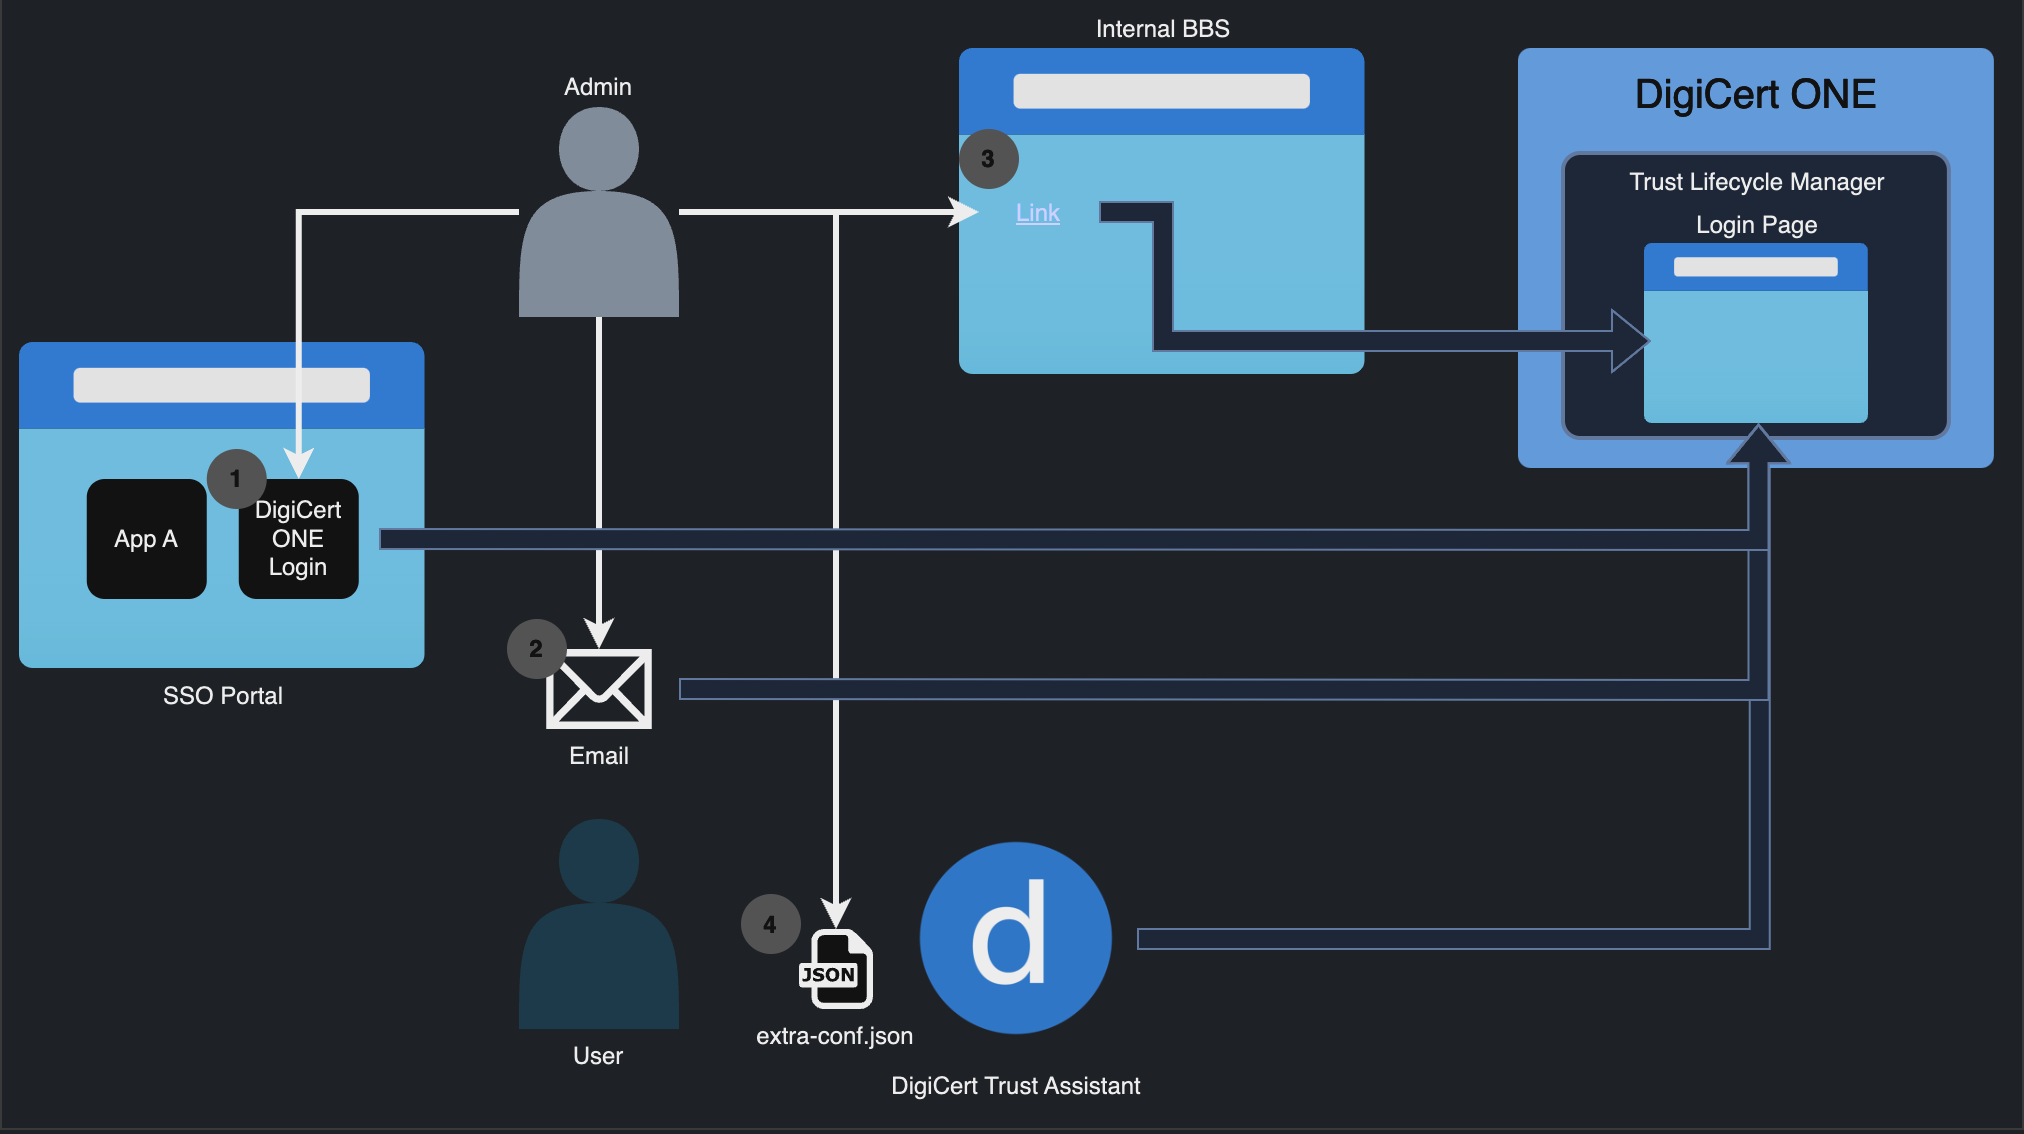
The following diagram demonstrates the delivery options of the DigiCert ONE Login URL.
Screenshot_2024-09-10_at_2_42_42_PM.png

Choose one of the following options that best suits your environment:

  • Use single sign-on self-service portal

  • Send the link to the user via email

  • Use the organization’s internal Bulletin Board System (BBS)

  • Use the group policy (for Windows domain only) or third-party Device Management solutions to place a configuration file (extra-conf.json) under a user’s directory. This is the recommended option for domain-joined Windows machines.

Using extra-conf.json

By using Group Policy (Windows domain only) or third-party Device Management solutions, the administrator can deliver DigiCert ONE login information by renaming the file as extra-conf.json under a specific user directory.

Configure the file with the following requirements:

  • Name: extra-conf.json

  • Path: ~/.digicert-trust-assistant/extra-conf.json

    • For Windows: C:\Users\<Username>\.digicert-trust-assistant\extra-conf.json

    • For Mac: /Users/<Username>/.digicert-trust-assistant/extra-conf.json

  • File encoding: ASCII or UTF-8

  • Data format: json

You can use the following template:

{ "signIn": [ { "description": "<Insert description for the login>", "hostUrl": "https://<DigiCert ONE host URL>/mpki/dtw", "accountId": "<account-uuid>" } ] }

Description for each configuration parameter:

  • signIn: Holds all the login information.

  • Description: (Optional) If updated, it will be shown to users so you can add any description to meet your needs. If omitted, the default description will be used.

  • hostUrl: This is the target host URL of DigiCert ONE.

    注記

    This is not the same as DigiCert ONE login URL, and is in the format: https://<DigiCert ONE host>/mpki/dtw.

  • accountId: This can be acquired from DigiCert ONE Login URL. The UUID at the end of the URL is the ID of your account.

Refer to Microsoft or third-party vendor documentation to create and provision this file in the user’s directory using Group Policy or a Device Management solution.

Using notification

After defining the extra-conf.json placed under ~/.digicert-trust-assistant/, reboot DigCert Trust Assistant. It will send a notification to the Dashboard.

Select the sign-in action and link within the notification to trigger the sign-in process. For more information, see Signing in.

Using the sign-in option

You can also sign in using sign-in page located at the top-right menu option. Defined values from the extra-config.json will be automatically filled and these values can be edited. Select Submit to trigger the sign-in.