Configure single sign-on with OIDC
Follow these steps to enable single sign-on (SSO) with OpenID Connect (OIDC) in your DigiCert ONE account.
Opmerking
Two-factor Authentication and SSO
When Two-factor authentication is enabled in Account Manager:
SSO using SAML
You will be prompted to enter an OTP when signing in even if you have already provided an OTP to your IDP.
SSO using OIDC
DigiCert will skip the OTP prompt if you have already provided an OTP to your Identity Provider (IDP).
Before you begin
Before configuring OIDC in DigiCert ONE:
Register DigiCert ONE as an OIDC application with your identity provider (IDP).
Configure your IDP to send a
preferred_usernameclaim in the ID token.
Tip
To learn how to register applications for OIDC and configure claims, refer to the documentation for your IDP.
Configure OIDC in DigiCert ONE
Sign in to DigiCert ONE.
Navigate to the Manager menu icon (top-right), select Account.
In the left navigation menu, select Accounts.
On the Accounts page, in the Name column, select the account you want enable OIDC authentication for.
On the Account details page, under Sign-in settings for all-account-access users, locate Single sign-on with OIDC. Select Edit.
On the Update OpenID Connect integration page, select the option to Enable OIDC authentication.
From the Update OpenID Connect integration page, copy the following values and provide them to your IDP wherever you configure the OIDC integration with DigiCert ONE.
Redirect / callback URL: When users sign in to an OIDC-enabled account, your OIDC service generates an authentication response and token ID. The OIDC service sends this authentication information back to DigiCert ONE using this URL.
Login initiation endpoint: DigiCert-provided URL that users can access to sign in to DigiCert ONE using OIDC-based SSO.
Logout endpoint: Your OIDC provider uses the logout endpoint to sign the user out of any applications they have logged into via the provider.
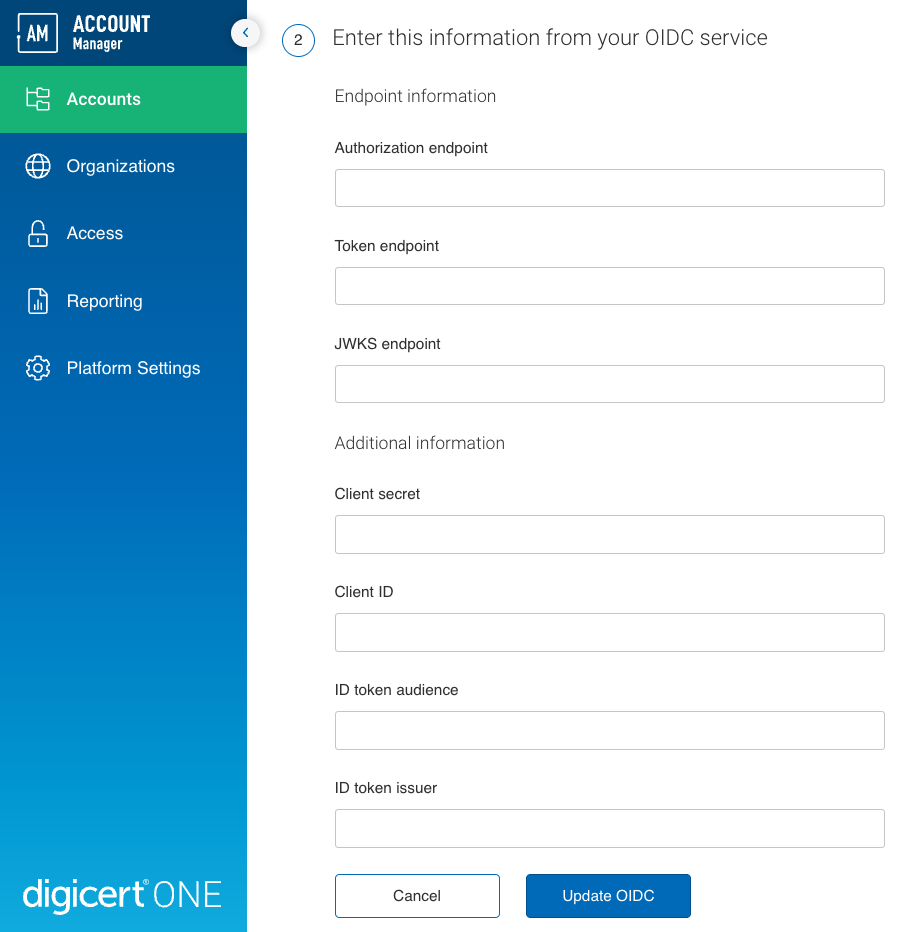
Under Enter this information from your OIDC service, enter the information your IDP provides for each of these values. To learn how to find these values, check the documentation for your IDP's OIDC service.

Authorization endpoint: Authorization endpoint for your OIDC service.
Token endpoint: Endpoint on the authorization server that DigiCert ONE can use to request access tokens from your OIDC service.
JWKS endpoint: Endpoint on the authorization server that DigiCert ONE can use to request a JSON Web Key Set (JWKS) with the public keys to verify access token signatures.
Client secret: Password from your IDP that DigiCert ONE can use to authenticate requests to your OIDC service.
Client ID: ID from your IDP that DigiCert ONE can use to identify itself in requests to your OIDC service.
ID token audience: Intended recipient of ID tokens your OIDC service generates. Must match the ID token audience configured in your IDP.
ID token issuer: Name (URL) of the ID token issuer for your OIDC service. Must match the ID token issuer configured in your IDP.
Select Update OIDC to save your settings in DigiCert ONE.
What's next
Finish any remaining steps in your IDP to finalize the connection to DigiCert ONE.
DigiCert ONE sends existing users in your account the Single sign-on access to DigiCert ONE email. The email lets them know you enabled SSO for their account. To access the SSO sign-in page, they need to select Sign in to DigiCert ONE. They will use the SSO URL (the DigiCert-provided login initiation endpoint) to sign in to their account.