Configure OIDC SSO between DigiCert and Okta
Use this procedure to configure single sign-on (SSO) between your DigiCert® account and Okta using OpenID Connect (OIDC).
To set up this sign in method, you need to switch between two tabs, DigiCert and Okta, to exchange URLs and other information.
Note
For more information, refer to Okta Help Center.
Before you begin
You need elevated privileges in DigiCert account and Okta:
Account admin user group required in DigiCert account.
Application Administrator or equivalent role required in Okta.
Access DigiCert's OIDC configuration page:
In the DigiCert® account menu, select the Accounts icon > Sign-in methods.
Select Single sign-on with OIDC.
Keep this tab open.
In another tab, create an OIDC app for your DigiCert account:
Sign in to your Okta Admin Console.
Go to Applications > Applications.
Select Create App integration:
Select OIDC - OpenID Connect as the Sign-in method.
Select Web application as the Application type.
Select Next.
Enter DigiCert® account as the App integration name.
Copy the following values from DigiCert and provide it in Okta:
Copy the Redirect URI and enter it into the Sign-in redirect URIs field in Okta
Copy the Logout URL and enter it into the Sign-out redirect URIs field.
In the Assignments section, select Skip group assignments for now.
Select Save.
On the General tab in Okta, scroll down to the General Setting section, and select Edit.
In the Login section, select Either Okta or App in the Login initiated by field.
Copy the Login URL from DigiCert into the Initiate login URI field.
Keep this tab open.
To finish the Connect your IdP to DigiCert section, source the following information from Okta:
Go to the General tab > Client credentials in Okta:
Copy the Client ID field and enter it in the following fields in DigiCert account:
Client ID
ID token audience
In the Client secrets section in Okta, copy the Client secret and enter it into the in the Client secret field in DigiCert.
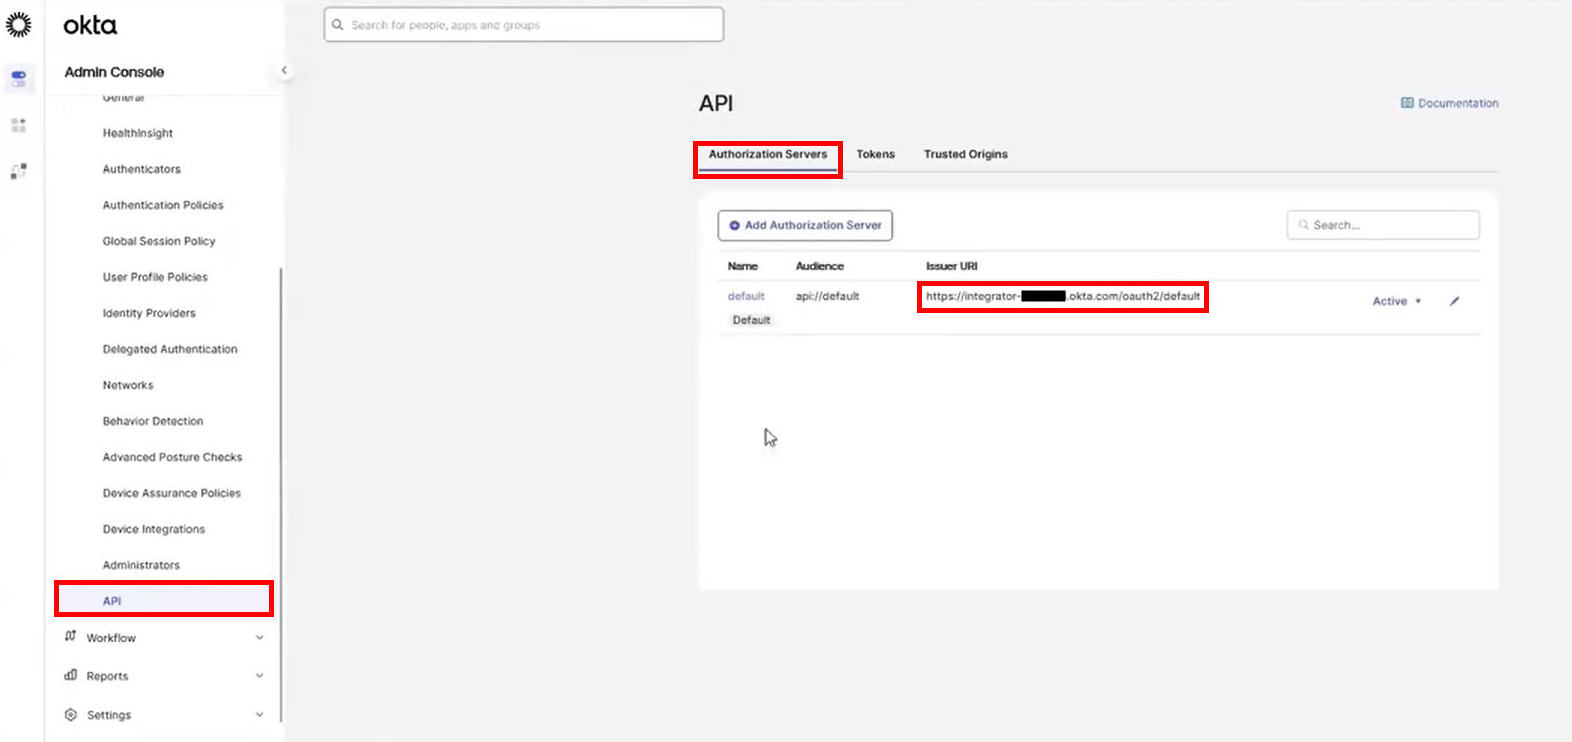
To construct the Provider URL required in DigiCert account:
From left menu, select Security > API.
On the Authorization servers tab, copy the Issuer URL.
Example:
https://example.okta.com/oauth2/default
Replace
/oauth2/defaultin the Issuer URL with/.well-known/openid-configuration
In DigiCert account:
Enter the constructed URL from Step 3.2 c, in the Provider URL in DigiCert account.
Example:
https://example.okta.com/.well-known/openid-configurationIn the Enable/Disable SSO with SAML section, switch to enable SSO.
Select Save configuration.
Ensure that all users in your DigiCert account are assigned to the SAML application in Okta Admin dashboard:
Go to Applications > Applications.
Select DigiCert account app you created.
Select the Assignments tab.
Select Assign > Assign People.
Next to the user's name, select Assign.
Select Save and Go Back.
Select Done.
Attempt to sign in to DigiCert account, using your Okta credentials:
Sign in to DigiCert® account.
Provide your Okta username.
Select Sign in with your company's SSO.
Tip
When 2FA is enabled, DigiCert skips the OTP prompt if you have already provided an OTP to your IdP.
Your SAML app is configured correctly if:
You use 2FA to access your IdP, and you’re automatically signed into your DigiCert account.
You don't use 2FA to access your IdP, you’re redirected to your DigiCert account and asked to finish two-factor authentication (2FA).
If you aren’t able to sign in with SSO, compare your app settings to these instructions or contact DigiCert Support for assistance.