Configure Microsoft CA server to prepare for integration
Follow these configuration steps to prepare your Microsoft CA server for the integration with DigiCert® Trust Lifecycle Manager.
If you don't already have one, create a group to use with Active Directory Certificate Services (AD CS). You will use this group to grant access to the Microsoft CA server and certificate templates.
To create a group on the Windows server:
Open Server Manager > Active Directory Users and Computers.
Right-click the Organizational Unit (OU) or folder where you want to create the group and select New > Group.
Assign the group a friendly name,
Globalgroup scope, and group typeSecurity.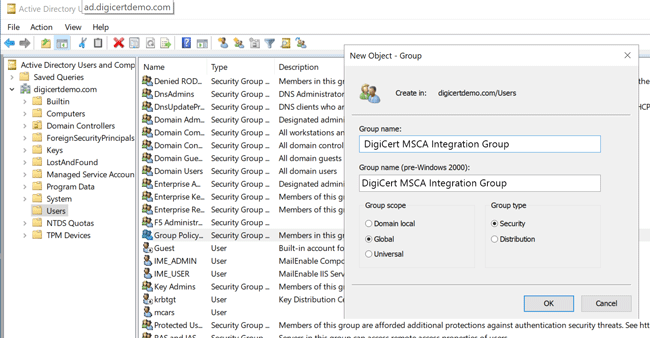
Example: Adding a new group called DigiCert MSCA Integration Group.
Next, create a service user to use for the integration and make it a member of the security group from step 1.
To create the service user and add it to the group:
Open Server Manager > Active Directory Users and Computers.
Right-click the Organizational Unit (OU) or folder where you want to create the service user and select New > User.
Configure the basic user properties. Make note of the username and password, so you can use them to configure the connector in Trust Lifecycle Manager.
Under the Member Of tab of the user properties, select Add and add the user to the security group from step 1.
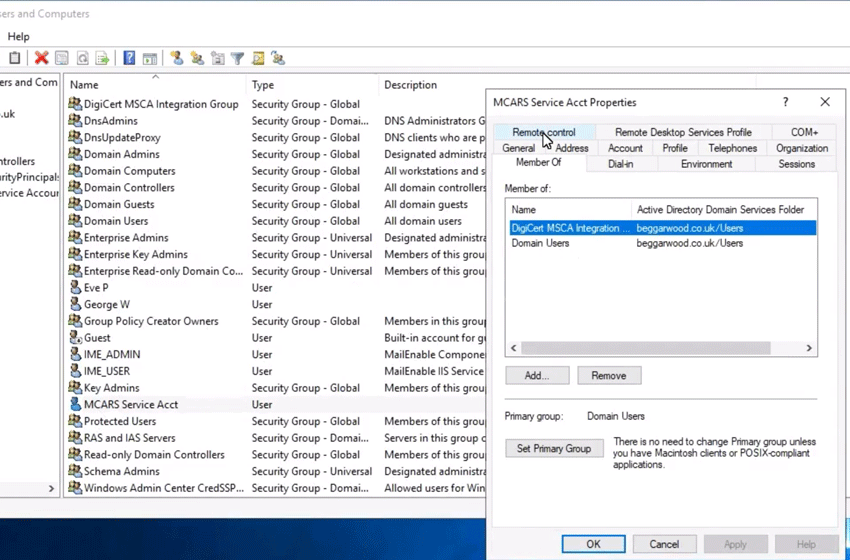
Example: Adding a service user to the group called DigiCert MSCA Integration Group.
Next, create Microsoft CA certificate templates that DigiCert® Trust Lifecycle Manager can use to enroll certificate against the Microsoft CA.
Create a separate template for each type of Microsoft CA certificate you want to enroll via Trust Lifecycle Manager. This can include a mix of User and Server certificates.
Use the default Microsoft CA templates as the basis for creating the certificate templates:
Open Server Manager > Certificate Authority.
Expand the CA, right-click on Certificate Templates and select Manage to access the Certificate Templates Console.
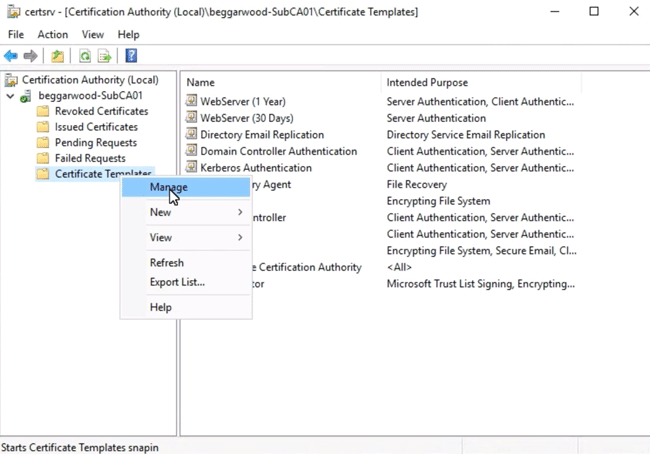
Example: Managing certificate templates.
Locate the appropriate default template to use in the righthand pane of the Certificate Templates Console, right-click on it, and select Duplicate template. For server certificates, use the Server default template. For user certificates, start with the User default template instead.
Configure the basic properties of the new certificate template:
General tab: Assign a friendly name to the new certificate template and set the validity and renewal periods for certificates issued from this template.
Compatibility tab: Set the compatibility options to the latest values to support the most current TLS certificate features.
Subject Name tab: Make sure the Supply in the request option is selected.
Other tabs: Configure per your business and cryptographic requirements.
When you're happy with your selections, select OK to save the new certificate template. You can always update the certificate template later by right-clicking it and selecting Properties.
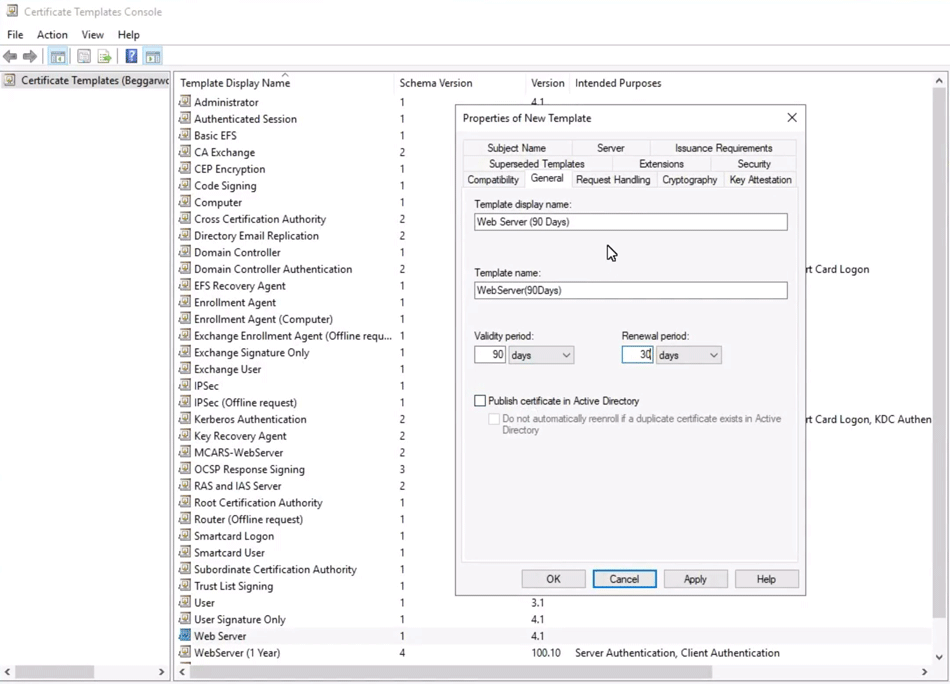
Example: Configuring the general properties of a new certificate template in the Certificate Templates Console.
Configure the Microsoft CA certificate templates you created in step 3 to add the security group from step 1, so the DigiCert connector can access them.
To add a security group to a certificate template:
From the Microsoft CA Certificate Templates Console, right-click on the template and select Properties.
In the Security tab, select Add and add the security group from step 1.
Give this security group the following permissions and select OK to save.
Read: Allows DigiCert to read data from this Microsoft certificate template.Write: Allows DigiCert to manage certificates using this Microsoft certificate template.Enroll: Allows DigiCert to enroll new certificates using this Microsoft certificate template.
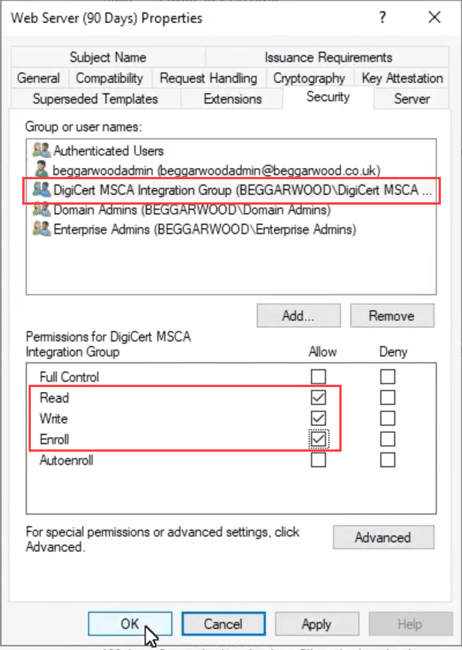
Example: Adding the security group called DigiCert MSCA Integration Group to the certificate template called Web Server (90 days) with the required permissions.
Enable issuance for each certificate template you created in step 3 so you can request certificates using Trust Lifecycle Manager.
To enable issuance for a certificate template on the Microsoft CA server:
Open Server Manager > Certificate Authority.
Expand the CA, right-click on Certificate Templates and select New > Certificate Template to Issue.
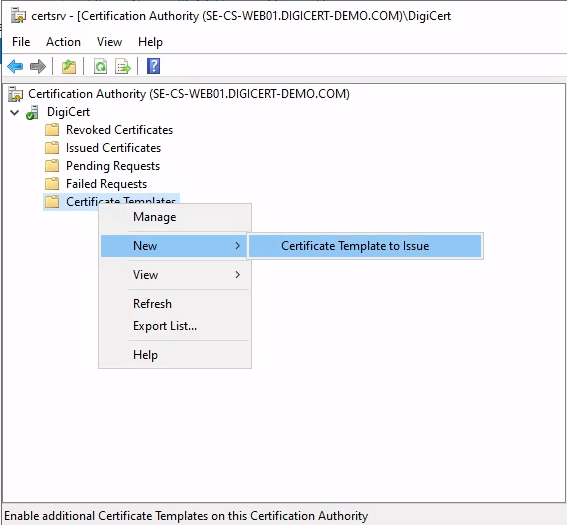
In the Enable Certificate Templates dialog that opens, select the template to enable for issuance and select OK.
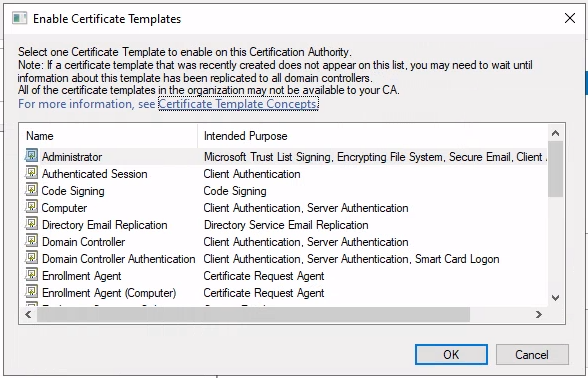
Repeat this process for each template you want to issue certificates from using Trust Lifecycle Manager.
Finally, configure the permissions of the Microsoft CA server itself to add the security group from step 1, so the DigiCert connector can carry out the required operations.
To add a security group to a Microsoft CA server:
Right-click on the CA and select Properties.
In the Security tab, select Add and add the security group from step 1.
Give this group the following permissions and select OK to save.
Issue and Manage Certificates: Allows DigiCert to enroll and revoke certificates against the Microsoft CA.Request Certificates: Allows DigiCert to discover and import certificates from the Microsoft CA.
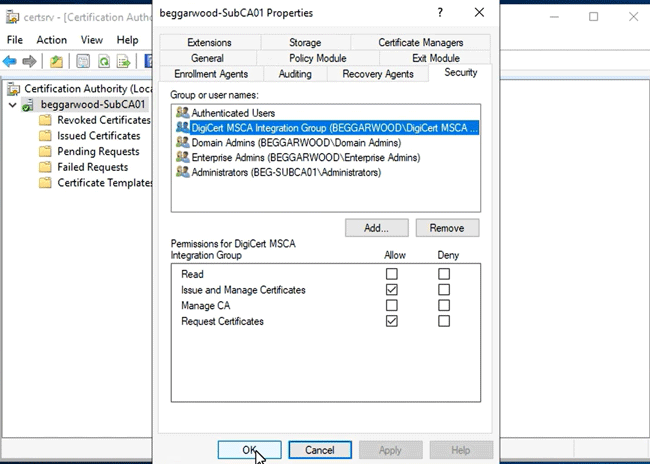
Example: Adding the security group called DigiCert MSCA Integration Group to a local Microsoft CA server with the required permissions.
Optional settings
To enable the following options for certificates issued from the Microsoft CA, complete the configuration in the applicable section.
To add an email address to the Subject DN of the issued certificate, you have two options:
CSR: Include the email address in the subject of the certificate signing request (CSR). This option is available by default.
Request attribute: Include the email address in the
attributes.subject.emailproperty of an API-based issuance request.
For option 2, you need to configure the Microsoft CA to allow fields sent as request attributes to be added to the Subject DN in the issued certificates. Use the following Windows Server certutil command to update the Microsoft CA configuration:
certutil -setreg ca\CRLFlags +CRLF_ALLOW_REQUEST_ATTRIBUTE_SUBJECT
Restart the Microsoft CA service after making this command for changes to take effect.
Tip
In the corresponding certificate profile in Trust Lifecycle Manager, select the REST API enrollment method. Add the Email field to the Subject DN with the Source for the field's value set to REST request.
When using DigiCert agents to automate certificate management on web servers with Microsoft CA-issued certificates, you can allow the first SAN in certificate requests to become the CN in the issued certificates. By default, the CN is left blank when there are only SANs present in the request.
To allow override of the CN in certificates, use the following Windows Server certutil command to update the Microsoft CA configuration:
certutil -setreg ca\CRLFlags +CRLF_ALLOW_REQUEST_ATTRIBUTE_SUBJECT
Restart the Microsoft CA service after making this command for changes to take effect.
When automating certificate management on A10 or Citrix ADC (NetScaler) appliances with Microsoft CA-issued certificates, if you need to support SANs in the issued certificates, you must allow the SANs to be submitted as additional attributes in the request.
To support SANs submitted as additional attributes for these appliance types, use the following Windows Server certutil command to update the Microsoft CA configuration:
certutil -setreg policy\EditFlags +EDITF_ATTRIBUTESUBJECTALTNAME2
Restart the Microsoft CA service after making this command for changes to take effect.
What's next
With the Microsoft CA server configured, you are ready to add the Microsoft CA connector in Trust Lifecycle Manager.