Configure single sign-on with OIDC

Follow these steps to enable single sign-on (SSO) with OpenID Connect (OIDC) in your DigiCert ONE account. If another sign-in method is also enabled, users can choose which method to use.

Prerequisites

Before configuring OIDC in DigiCert ONE:

  • Have administrator access to your company's identity provider (IDP) service, such as PingOne and Okta.

  • Register DigiCert ONE as an OIDC application with your identity provider (IDP).

  • Configure your IDP to send a preferred_username claim in the ID token.

작은 정보

To learn how to register applications for OIDC and configure claims, refer to the documentation for your IDP.

Configure OIDC in DigiCert ONE

  1. Sign in to DigiCert ONE.

  2. In the Managers (grid icon) menu, select Account.

  3. In the Account menu, go to Accounts.

  4. On the Accounts page, in the Name column, select the account you want enable OIDC authentication for.

  5. On the Account details page, under Sign-in settings for all-account-access users, locate Single sign-on with OIDC. Select Edit.

  6. On the Update OpenID Connect integration page, select the option to Enable OIDC authentication.

  7. From the Update OpenID Connect integration page, copy the following values and provide them to your IDP wherever you configure the OIDC integration with DigiCert ONE.

    • Redirect / callback URL: When users sign in to an OIDC-enabled account, your OIDC service generates an authentication response and token ID. The OIDC service sends this authentication information back to DigiCert ONE using this URL.

    • Login initiation endpoint: DigiCert-provided URL that users can access to sign in to DigiCert ONE using OIDC-based SSO.

    • Logout endpoint: Your OIDC provider uses the logout endpoint to sign the user out of any applications they have logged into via the provider.

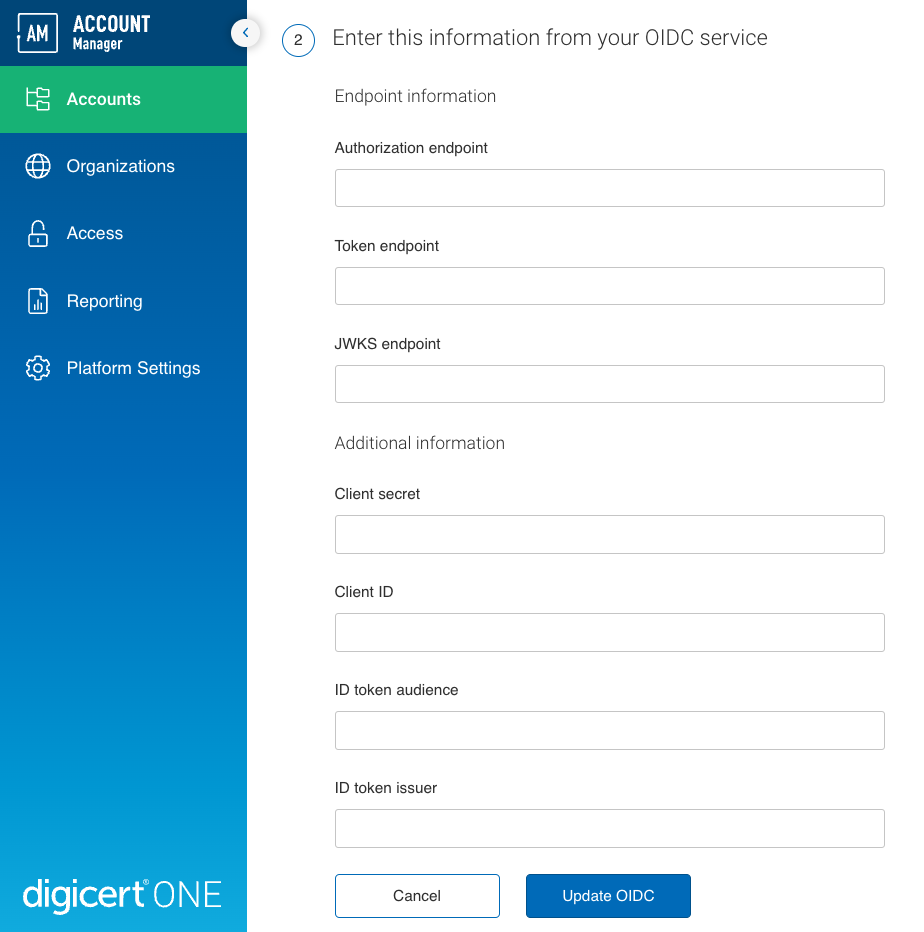
  8. Under Enter this information from your OIDC service, enter the information your IDP provides for each of these values. To learn how to find these values, check the documentation for your IDP's OIDC service.

    account-manager-oidc-configuration.png
    • Authorization endpoint: Authorization endpoint for your OIDC service.

    • Token endpoint: Endpoint on the authorization server that DigiCert ONE can use to request access tokens from your OIDC service.

    • JWKS endpoint: Endpoint on the authorization server that DigiCert ONE can use to request a JSON Web Key Set (JWKS) with the public keys to verify access token signatures.

    • Client secret: Password from your IDP that DigiCert ONE can use to authenticate requests to your OIDC service.

    • Client ID: ID from your IDP that DigiCert ONE can use to identify itself in requests to your OIDC service.

    • ID token audience: Intended recipient of ID tokens your OIDC service generates. Must match the ID token audience configured in your IDP.

    • ID token issuer: Name (URL) of the ID token issuer for your OIDC service. Must match the ID token issuer configured in your IDP.

  9. Select Update OIDC to save your settings in DigiCert ONE.

Troubleshooting

  1. Sign in to your Okta Admin Console

  2. Go to Applications > Applications.

  3. Select Create App integration:

  4. Select OIDC - OpenID Connect as the Sign-in method.

  5. Select Web application as the Application type.

  6. Select Next.

  7. Enter DigiCert​​®​​ account as the App integration name.

  8. Optional: Add a logo to the App logo field.

  9. Refer to Connect DigiCert to your IdP to complete the following fields:

    1. Copy the Redirect URI from DigiCert account and paste it into the Sign-in redirect URIs field in Okta.

      Example: https://accounts.digicert.com/app/imauth/sso/oidc/callback

    2. Copy the Logout URL from DigiCert account and paste it into the Sign-out redirect URIs field in Okta.

      Example: https://accounts.digicert.com/app/imauth/api/v1/logout

    3. Copy the Login URL from DigiCert account and paste it into the Initiate login URI field in Okta.

      Example: https://accounts.digicert.com/app/imauth/sso/oidc/a1bc2345d678912e345ef6e78gh91234i5

  10. Complete all compulsory fields based on your security standards.

  11. Select Save.

  12. On the General tab, identify the following information to complete the Connect your IdP to DigiCert:

    1. Copy the Client ID field in Okta and paste it in the Client ID field in DigiCert account.

    2. Copy the Client secret field in Okta and paste it in the Client secret field in DigiCert account.

    3. Identify the well-known discovery URL (your Okta domain), also referred to as the Issuer URL in Okta and paste it into the Provider URL in DigiCert account. Example: https://{yourOktaDomain}/.well-known/openid-configuration

    4. In the Login section, copy the Token ID field in Okta and paste it into the ID token audience field in DigiCert.

    5. Copy the Issuer URL in Okta and paste it into the Provider URL field.

  13. Select the Assignments tab to assign necessary users to DigiCert​​®​​ account.

참고

For more information, refer to Okta Help Center.

  1. Sign in to your Microsoft Entra admin center.

  2. Go to App registrations > New registration.

  3. Select Create App integration:

  4. Select OIDC - OpenID Connect as the Sign-in method.

  5. Enter DigiCert​​®​​ account in the Name field.

  6. In the field Who can use this application or access this API?, select Accounts in this organizational directory only.

  7. Identify the Redirect URL (optional) section in Microsoft Entra:

    1. In the first dropdown menu, select Web.

    2. Copy the Redirect URI from DigiCert account and paste it in the second dropdown menu.

      Example: https://accounts.digicert.com/app/imauth/sso/oidc/callback

  8. Select Register.

  9. Once registered, select Overview > Endpoints.

  10. Open the OpenID Connect metadata document URL and copy the Issuer URL and paste it into the Provider URL in DigiCert account.

  11. In the Essentials section, create a client secret:

    1. Copy the Application (client) ID field in Microsoft Entra and paste it in the Client ID and ID token audience field in DigiCert account.

    2. To create a client secret:

      1. Select Add a certificate or secret in the Client credentials field.

      2. Select Client secrets > New client secret.

      3. Enter DigiCert​​®​​ account in the Description field.

      4. Select an expiry date in the Expires field.

      5. Select Add.

    3. On the Client secrets tab, copy the value next to the DigiCert​​®​​ account secret you just created and paste it in the Client secret field in DigiCert account.

  12. Refer to Connect DigiCert to your IdP to complete the following fields:

    1. Copy the Logout URL from DigiCert account and paste it into the Sign-out redirect URIs field in Microsoft Entra.

      Example: https://accounts.digicert.com/app/imauth/api/v1/logout

    2. Copy the Login URL from DigiCert account and paste it into the Base URIs field in Microsoft Entra.

      Example: https://accounts.digicert.com/app/imauth/sso/oidc/a1bc2345d678912e345ef6e78gh91234i5

  13. Select the Assignments tab to assign necessary users to DigiCert​​®​​ account.

  1. Sign in to your PingOne admin console.

  2. Go to Applications > Applications.

  3. Select Add application:

  4. Select OIDC Web App (or OIDC Web in PingFederate) as the Sign-in method.

  5. Select Web application as the Application type.

  6. Enter DigiCert​​®​​ account as the Application name.

  7. Optional: Add a logo to the App logo field.

  8. Refer to Connect DigiCert to your IdP to complete the following fields:

    1. Copy the Redirect URI from DigiCert account and paste it into the Sign-in redirect URIs field in Ping ID.

      Example: https://accounts.digicert.com/app/imauth/sso/oidc/callback

    2. Copy the Logout URL from DigiCert account and paste it into the Logout Redirect URI field in Ping ID.

      Example: https://accounts.digicert.com/app/imauth/api/v1/logout

    3. Copy the Login URL from DigiCert account and paste it into the Base/Login URI field in Ping ID.

      Example: https://accounts.digicert.com/app/imauth/sso/oidc/a1bc2345d678912e345ef6e78gh91234i5

  9. Complete all compulsory fields based on your security standards.

  10. Select Save.

  11. On the Configuration / General tab tab, identify the following information to complete the Connect your IdP to DigiCert:

    1. Copy the Client ID field in Ping ID and paste it in the Client ID field in DigiCert account.

    2. Copy the Client secret field in Ping ID and paste it in the Client secret field in DigiCert account.

    3. Identify the well-known discovery URL (your Ping ID domain), also referred to as the Issuer URL in Ping ID and paste it into the Provider URL in DigiCert account. Example: https://{yourPingIdDomain}/.well-known/openid-configuration

    4. In the Login section, copy the Token ID field in Ping ID and paste it into the ID token audience field in DigiCert.

    5. Copy the Issuer URL in Ping ID and paste it into the Provider URL field.

  12. Select the Assignments tab to assign necessary users to DigiCert​​®​​ account.

What's next

Finish any remaining steps in your IDP to finalize the connection to DigiCert ONE

DigiCert ONE sends existing users in your account the Single sign-on access to DigiCert email. The email lets them know you enabled SSO for their account. To access the SSO sign-in page, they need to select Sign in. They will use the SSO URL (the DigiCert-provided login initiation endpoint) to sign in to their account.

Two-Factor Authentication (2FA) and SSO with OIDC

When 2FA is enabled, DigiCert will skip the OTP prompt if you have already provided an OTP to your IdP.