OIDC を使用したシングルサインオンの設定
以下の手順に従って、DigiCert ONE アカウントで OIDC (OpenID Connect)を使用した SSO (シングルサインオン)を有効にします。他のサインイン方法も有効になっている場合、ユーザーは使用する方法を選択できます。
前提条件
DigiCert ONE で OIDC を設定する前に、以下のことを確認してください。
お使いの IDP (ID プロバイダ)サービス(例: PingOne、Okta)に対する管理者アクセス権を持っていること。
IDP (ID プロバイダ)側で DigiCert ONE が OIDC アプリケーションとして登録されていること。
IDP 側で ID トークンに
preferred_username
クレームを含めるよう構成していること。
ヒント
OIDC アプリケーションの登録方法やクレームの設定方法については、IDP のドキュメントを参照してください。
OIDC の設定 - DigiCert ONE
DigiCert ONE にサインインします。
[マネージャ]メニュー()で、[アカウント]を選択します。
[アカウント]メニューで、[アカウント]を選択します。
[アカウント]ページの[名前]列で、OIDC 認証を有効にするアカウントを選択します。
[アカウントの詳細]ページの[すべてのアカウントにアクセスできるユーザーのサインイン設定]で、[OIDC でシングルサインオン]を見つけます。[編集]を選択します。
[OpenID Connect 統合の更新]ページで、[OIDC 認証を有効にする]オプションを選択します。
[OpenID Connect 統合の更新]ページで、次の値をコピーして、DigiCert ONE との OIDC 統合を構成する際に IDP 側の必要な場所に入力します。
リダイレクト/コールバック URL: OIDC が有効化されたアカウントにユーザーがサインインすると、OIDC サービスは認証レスポンスとトークン ID を生成します。OIDC サービスは、この URL を使用して、その認証情報を DigiCert ONE に返します。
ログイン開始エンドポイント: デジサートが提供する URL で、ユーザーは OIDC ベースの SSO で DigiCert ONE にサインインできます。
ログアウトエンドポイント: OIDC プロバイダは、ログアウトエンドポイントを使用して、ユーザがプロバイダ経由でログインしているすべてのアプリケーションからサインアウトさせることができます。
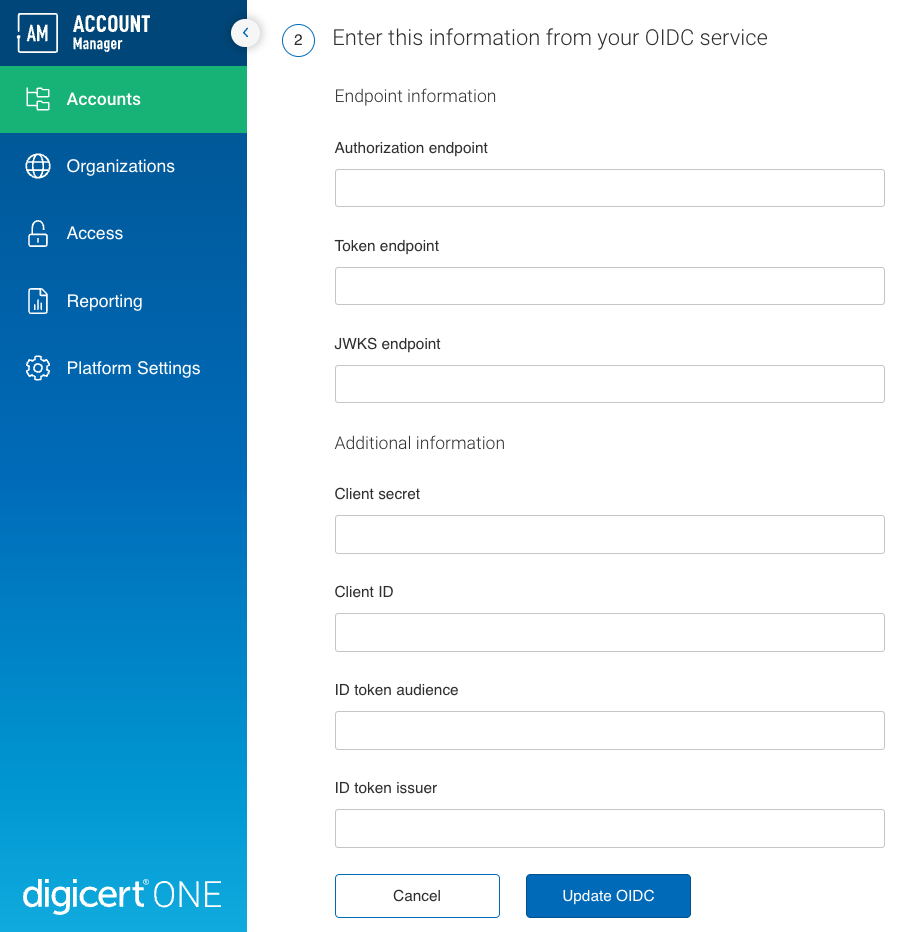
[OIDC サービスからこの情報を入力してください]の下に、IDP から取得した値をそれぞれ入力します。これらの値を見つける方法については、IDP の OIDC サービスのドキュメントを参照してください。
認可エンドポイント: OIDC サービスの認可エンドポイントです。
トークンエンドポイント: 認証サーバー上のエンドポイントで、DigiCert ONE が OIDC サービスにアクセストークンを要求する際に使用します。
JWKS エンドポイント: 認証サーバー上のエンドポイントで、DigiCert ONE がアクセストークンの署名を検証するための公開鍵を含む JWKS (JSON Web Key Set)を要求する際に使用します。
クライアントシークレット: IDP から提供されるパスワードで、DigiCert ONE が OIDC サービスへの要求を認証するために使用します。
クライアント ID: IDP から提供される ID で、DigiCert ONE が OIDC サービスへの要求時に自身を識別するために使用します。
ID トークンオーディエンス: OIDC サービスが生成する ID トークンの想定受信者です。IDP 側で設定されている IDトークンオーディエンス値と一致している必要があります。
ID トークン発行者: OIDC サービスの ID トークン発行者の名前(URL)です。IDP 側で設定されている IDトークン発行者と一致している必要があります。
[Update OIDC]を選択すると、DigiCert ONE に設定が保存されます。
Troubleshooting
Sign in to your Okta Admin Console
Go to Applications > Applications.
Select Create App integration:
Select OIDC - OpenID Connect as the Sign-in method.
Select Web application as the Application type.
Select Next.
Enter DigiCert® account as the App integration name.
Optional: Add a logo to the App logo field.
Refer to Connect DigiCert to your IdP to complete the following fields:
Copy the Redirect URI from DigiCert account and paste it into the Sign-in redirect URIs field in Okta.
Example:
https://accounts.digicert.com/app/imauth/sso/oidc/callback
Copy the Logout URL from DigiCert account and paste it into the Sign-out redirect URIs field in Okta.
Example:
https://accounts.digicert.com/app/imauth/api/v1/logout
Copy the Login URL from DigiCert account and paste it into the Initiate login URI field in Okta.
Example:
https://accounts.digicert.com/app/imauth/sso/oidc/a1bc2345d678912e345ef6e78gh91234i5
Complete all compulsory fields based on your security standards.
Select Save.
On the General tab, identify the following information to complete the Connect your IdP to DigiCert:
Copy the Client ID field in Okta and paste it in the Client ID field in DigiCert account.
Copy the Client secret field in Okta and paste it in the Client secret field in DigiCert account.
Identify the well-known discovery URL (your Okta domain), also referred to as the Issuer URL in Okta and paste it into the Provider URL in DigiCert account. Example:
https://{yourOktaDomain}/.well-known/openid-configuration
In the Login section, copy the Token ID field in Okta and paste it into the ID token audience field in DigiCert.
Copy the Issuer URL in Okta and paste it into the Provider URL field.
Select the Assignments tab to assign necessary users to DigiCert® account.
注記
For more information, refer to Okta Help Center.
Sign in to your Microsoft Entra admin center.
Go to App registrations > New registration.
Select Create App integration:
Select OIDC - OpenID Connect as the Sign-in method.
Enter DigiCert® account in the Name field.
In the field Who can use this application or access this API?, select Accounts in this organizational directory only.
Identify the Redirect URL (optional) section in Microsoft Entra:
In the first dropdown menu, select Web.
Copy the Redirect URI from DigiCert account and paste it in the second dropdown menu.
Example:
https://accounts.digicert.com/app/imauth/sso/oidc/callback
Select Register.
Once registered, select Overview > Endpoints.
Open the OpenID Connect metadata document URL and copy the Issuer URL and paste it into the Provider URL in DigiCert account.
In the Essentials section, create a client secret:
Copy the Application (client) ID field in Microsoft Entra and paste it in the Client ID and ID token audience field in DigiCert account.
To create a client secret:
Select Add a certificate or secret in the Client credentials field.
Select Client secrets > New client secret.
Enter DigiCert® account in the Description field.
Select an expiry date in the Expires field.
Select Add.
On the Client secrets tab, copy the value next to the DigiCert® account secret you just created and paste it in the Client secret field in DigiCert account.
Refer to Connect DigiCert to your IdP to complete the following fields:
Copy the Logout URL from DigiCert account and paste it into the Sign-out redirect URIs field in Microsoft Entra.
Example:
https://accounts.digicert.com/app/imauth/api/v1/logout
Copy the Login URL from DigiCert account and paste it into the Base URIs field in Microsoft Entra.
Example:
https://accounts.digicert.com/app/imauth/sso/oidc/a1bc2345d678912e345ef6e78gh91234i5
Select the Assignments tab to assign necessary users to DigiCert® account.
Sign in to your PingOne admin console.
Go to Applications > Applications.
Select Add application:
Select OIDC Web App (or OIDC Web in PingFederate) as the Sign-in method.
Select Web application as the Application type.
Enter DigiCert® account as the Application name.
Optional: Add a logo to the App logo field.
Refer to Connect DigiCert to your IdP to complete the following fields:
Copy the Redirect URI from DigiCert account and paste it into the Sign-in redirect URIs field in Ping ID.
Example:
https://accounts.digicert.com/app/imauth/sso/oidc/callback
Copy the Logout URL from DigiCert account and paste it into the Logout Redirect URI field in Ping ID.
Example:
https://accounts.digicert.com/app/imauth/api/v1/logout
Copy the Login URL from DigiCert account and paste it into the Base/Login URI field in Ping ID.
Example:
https://accounts.digicert.com/app/imauth/sso/oidc/a1bc2345d678912e345ef6e78gh91234i5
Complete all compulsory fields based on your security standards.
Select Save.
On the Configuration / General tab tab, identify the following information to complete the Connect your IdP to DigiCert:
Copy the Client ID field in Ping ID and paste it in the Client ID field in DigiCert account.
Copy the Client secret field in Ping ID and paste it in the Client secret field in DigiCert account.
Identify the well-known discovery URL (your Ping ID domain), also referred to as the Issuer URL in Ping ID and paste it into the Provider URL in DigiCert account. Example:
https://{yourPingIdDomain}/.well-known/openid-configuration
In the Login section, copy the Token ID field in Ping ID and paste it into the ID token audience field in DigiCert.
Copy the Issuer URL in Ping ID and paste it into the Provider URL field.
Select the Assignments tab to assign necessary users to DigiCert® account.
次の操作
IDP 側で残りのステップをすべて終了し、接続を完了させます。 DigiCert ONE
DigiCert ONE は、アカウント内の既存ユーザーに、「Single sign-on access to DigiCert」というメールを送信します。このメールにより、アカウントに対して SSO が有効になったことがユーザーに通知されます。ユーザーは[サインイン]を選択して、SSO サインインページにアクセスします。その際、SSO URL(デジサートが提供するログイン開始エンドポイント)を使用してアカウントにサインインします。
二要素認証(2FA)と OIDC を使用した SSO
2FA が有効になっている場合でも、IdP に対してすでに OTP が入力されている場合、デジサートは OTP の入力を求めません。