Set up your CertCentral account
This guide walks you through setting up your account and configuring the initial settings. With your account ready, managing SSL certificates becomes easier, letting you focus on what matters most.
Manage your profile and preferences
To access your Profile Settings page, select My Profile. from the dropdown next to your name.
On the Profile Settings page, you can verify and update your personal details—such as email, username, password, phone number, job title, and language preference.
You can also manage your API keys (for API documentation, see our Developers portal).
Payment options
In CertCentral , you can pay using either a credit card or your account balance.
Credit card
Pay by credit card when ordering a certificate. Use it for one-time payments or save a card for future orders.
As credit card details are stored per user and not shared, automatic renewal isn’t available.
Since credit card details are stored per user and not shared, automatic renewal isn’t available. If you want auto-renewal, go with the Bill to account balance option instead.
Account balance
You can deposit funds directly into your CertCentral account and use the balance to pay for certificates.
Advantage
This allows you to enable automatic renewal for certificates.
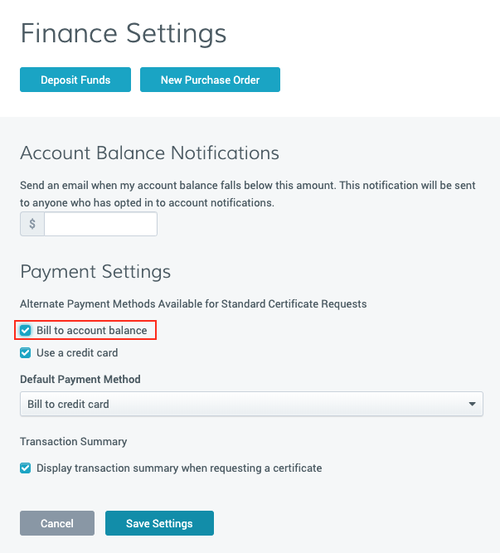
To enable account balance payment:
Go to Finances > Settings in the sidebar menu
Enable the Bill to account balance payment method.

When enabled, you can deposit funds into your account.
To deposit funds in your account, use one of these methods:
Go to the Finances > Deposit Funds page and deposit using your credit card.
Go to the Finances > Purchase Order page and make a deposit with a purchase order.
Submit a PO, and DigiCert sends an invoice.
Pay the invoice to credit your account.
Account-wide notifications
The original administrator’s email (used to create your CertCentral account) automatically receives all account emails, including renewal notifications.
To add more email address to receive all account notifications.
Go to the Notifications page in the sidebar menu.
Select Settings > Notifications.
(Optional) Use a dedicated email address or distribution list to track all account activity.
Renewal notifications
CertCentral notifies all account administrators and the user who requested the certificate of upcoming expirations. Notifications are sent to the same email addresses at each stage before expiration.
Recommendation: Enable renewal notifications at the account level to prevent unintended certificate expiration and potential site downtime.
By default, CertCentral sends certificate renewal notices 90, 60, 30, 7, and 3 days before expiration, and again 7 days after expiration.
To customize your account renewal notifications:
Go to Certificate Renewal Settings in the sidebar menu.
Select Settings > Preferences.
Configure the following preferences:
Schedule the timing for renewal notifications.
Add more email addresses to receive renewal notifications.
Set up escalation notifications to alert specific email addresses at each interval. See Configure Escalation Renewal Notifications.
Email addresses included in Account-wide notifications automatically receive renewal notifications. You don’t need to add them here again.
Order-specific renewal notifications
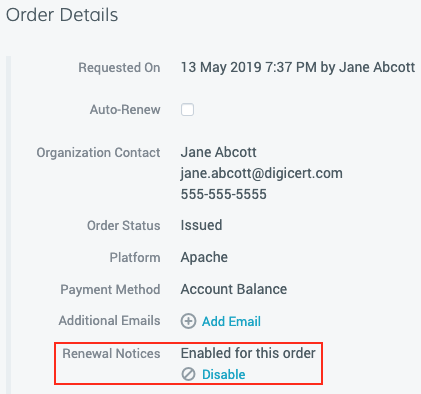
You can turn off renewal notifications for individual certificate orders while keeping account-wide notifications active.
To disable or re-enable renewal notifications for a certificate order:
Go to the certificate's Order Details page.
In the Order Details section, you can:
Disable renewal notifications for the order.
Re-enable a disabled notification by selecting Enable.

Account access and two-factor authentication (2FA) settings
DigiCert requires all CertCentral accounts to use two-factor authentication (2FA): something you know and something you have.
By default, you must enter your credentials and a one-time password to access your CertCentral account.
To set a different 2FA method or configure authentication requirements like password complexity:
Go to Authentication Settings page in the sidebar menu.
Select Settings > Authentication Settings.
You can set password requirements, including length, character categories, and expiration, along with other account access settings.
Audit logs
Audit logs provide a history of actions that occur in your account.
CertCentral automatically records more than 50 actions, including sign-ins, certificate requests, and revocations. Each entry shows the time and the user who performed the action.
To view them in your account,
Go to the Audit Logs page in the sidebar menu.
Select Account > Audit Logs.